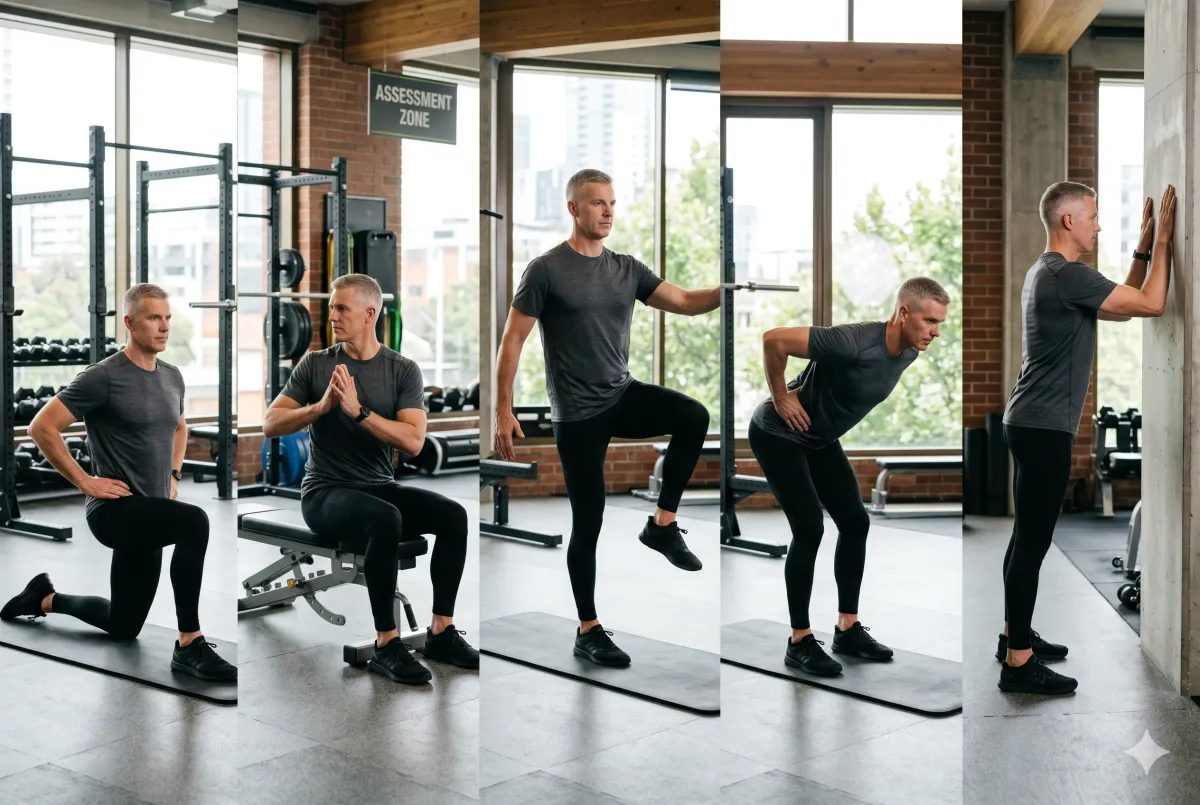
Image of a model doing the 5 exercises demonstrated in the article.

Does Your Desk Job Have a Structural Problem? Five Tests to Find Out

May 08, 20265 min read

Most professionals I work with at Lightwater Leisure Centre arrive with a vague sense that something is off. Their back tightens after long drives. Their hips feel stiff getting up from a meeting. They chalk it up to getting older and get on with it.

It is not age. As I covered in Why Your Back Pain Is a Mechanical Problem, Not an Ageing Problem, it is structural adaptation - your body has reorganised itself around the demands of a professional lifestyle. The question is how far that adaptation has progressed, and whether it is quietly limiting you in ways you have not yet connected to your desk.

These five assessments will give you a clearer picture. You do not need a gym or any equipment. You need about ten minutes and the willingness to be honest about what you find.

1. The Hip Flexor Length Test

Stand in a split stance with one foot forward and one knee on the floor - a half-kneeling position. Without arching your lower back, shift your weight forward until you feel a stretch at the front of the rear hip. If you cannot get into this position without your lower back immediately extending to compensate, your hip flexors are shortened.

Shortened hip flexors pull the pelvis into anterior tilt. That changes the resting position of your lumbar spine and increases the mechanical load on the facet joints every time you move. If this test is difficult, your lower back is already working harder than it should be -- all day, every day.
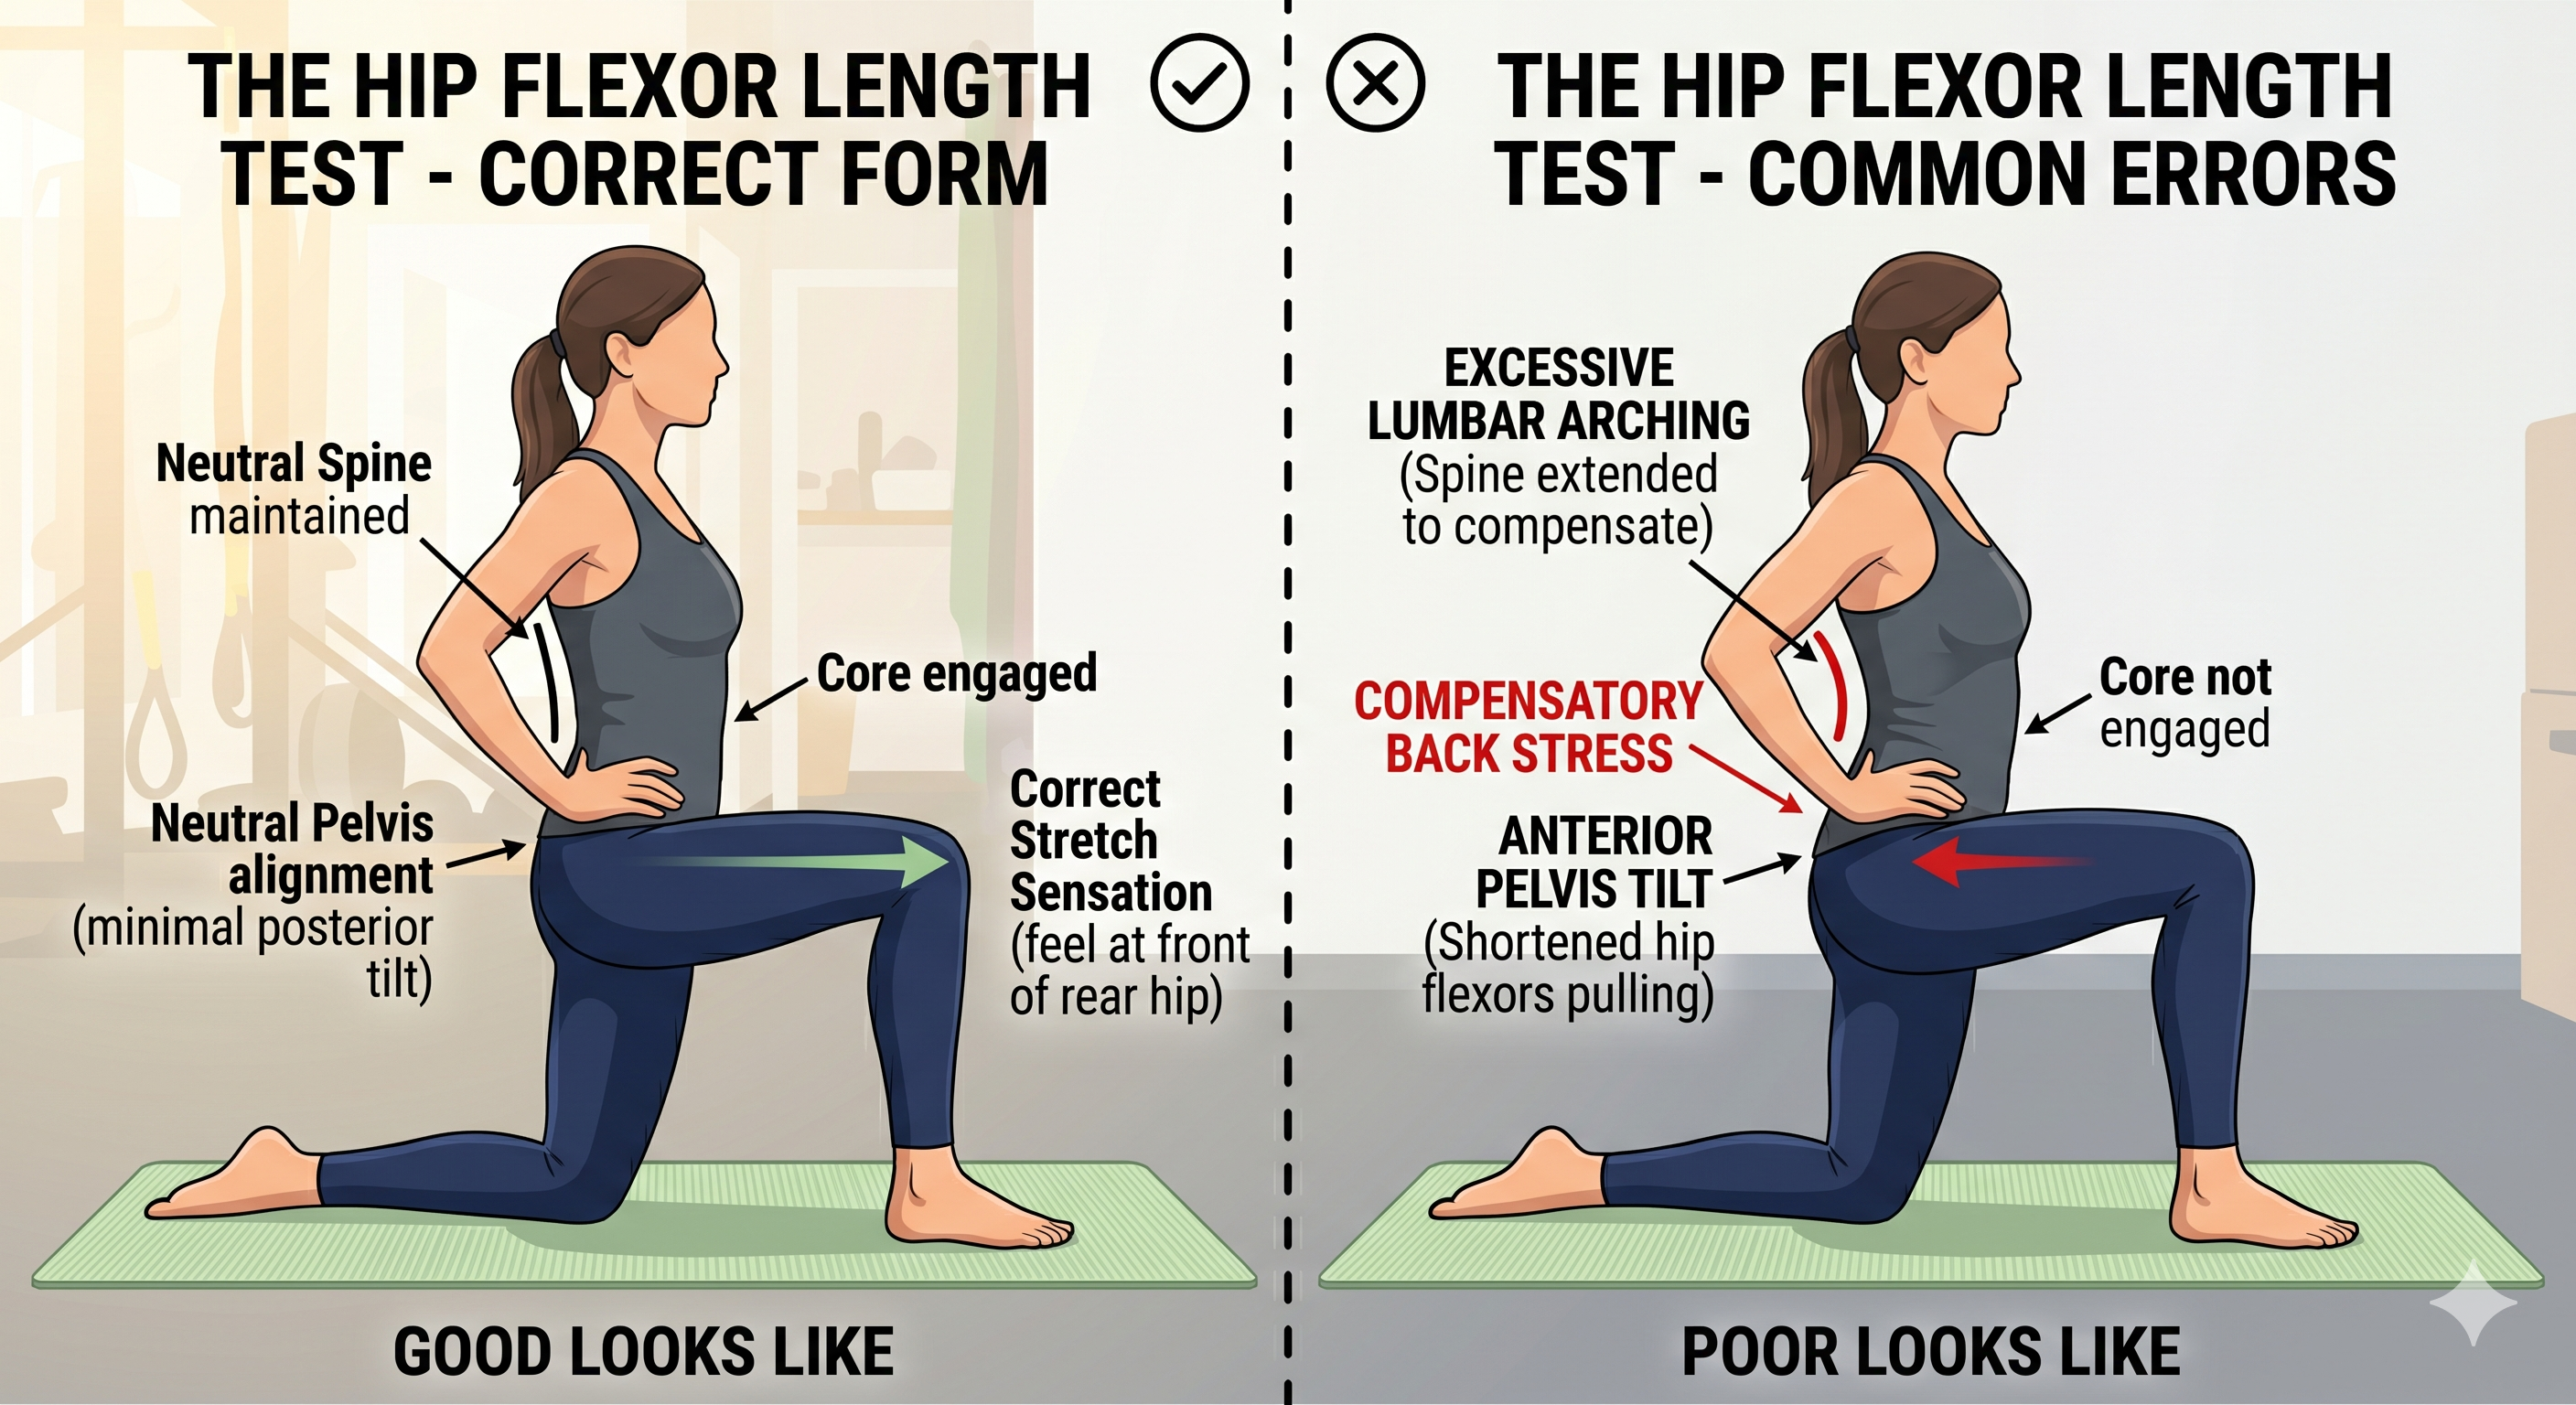
A two-panel infographic comparison illustrating the Hip Flexor Length Test with correct and incorrect form. On the left, "Correct Form" features a woman with a neutral spine, engaged core, and minimal posterior tilt. Arrows and a green horizontal line show a proper stretch sensation in the rear hip. On the right, "Common Errors" shows "Poor Looks Like," featuring the same woman with excessive lumbar arching, anterior pelvis tilt, and an unengaged core, leading to "Compensatory Back Stress." Both panels use text boxes and icons (checkmark and 'X'). The illustrations show her kneeling on a green yoga mat.
Learn how to assess your hip mobility with the Hip Flexor Length Test. This visual guide highlights the difference between correct form and common mistakes to avoid.

2. The Thoracic Rotation Test

Sit upright on a chair with your feet flat on the floor and your arms crossed over your chest. Without moving your hips or lower back, rotate your upper body to each side and note how far you get. A functional range is around 45 degrees each way. Most desk-bound professionals in their 40s and 50s find one side significantly more restricted than the other.

The thoracic spine is supposed to be the primary site of rotational movement in the upper body. When it stiffens, that rotation has to come from somewhere - and it tends to come from the lumbar spine, which is built for stability rather than rotation. This is one of the most common mechanical contributors to lower back pain I see in Surrey professionals, and it shows up clearly in this test.
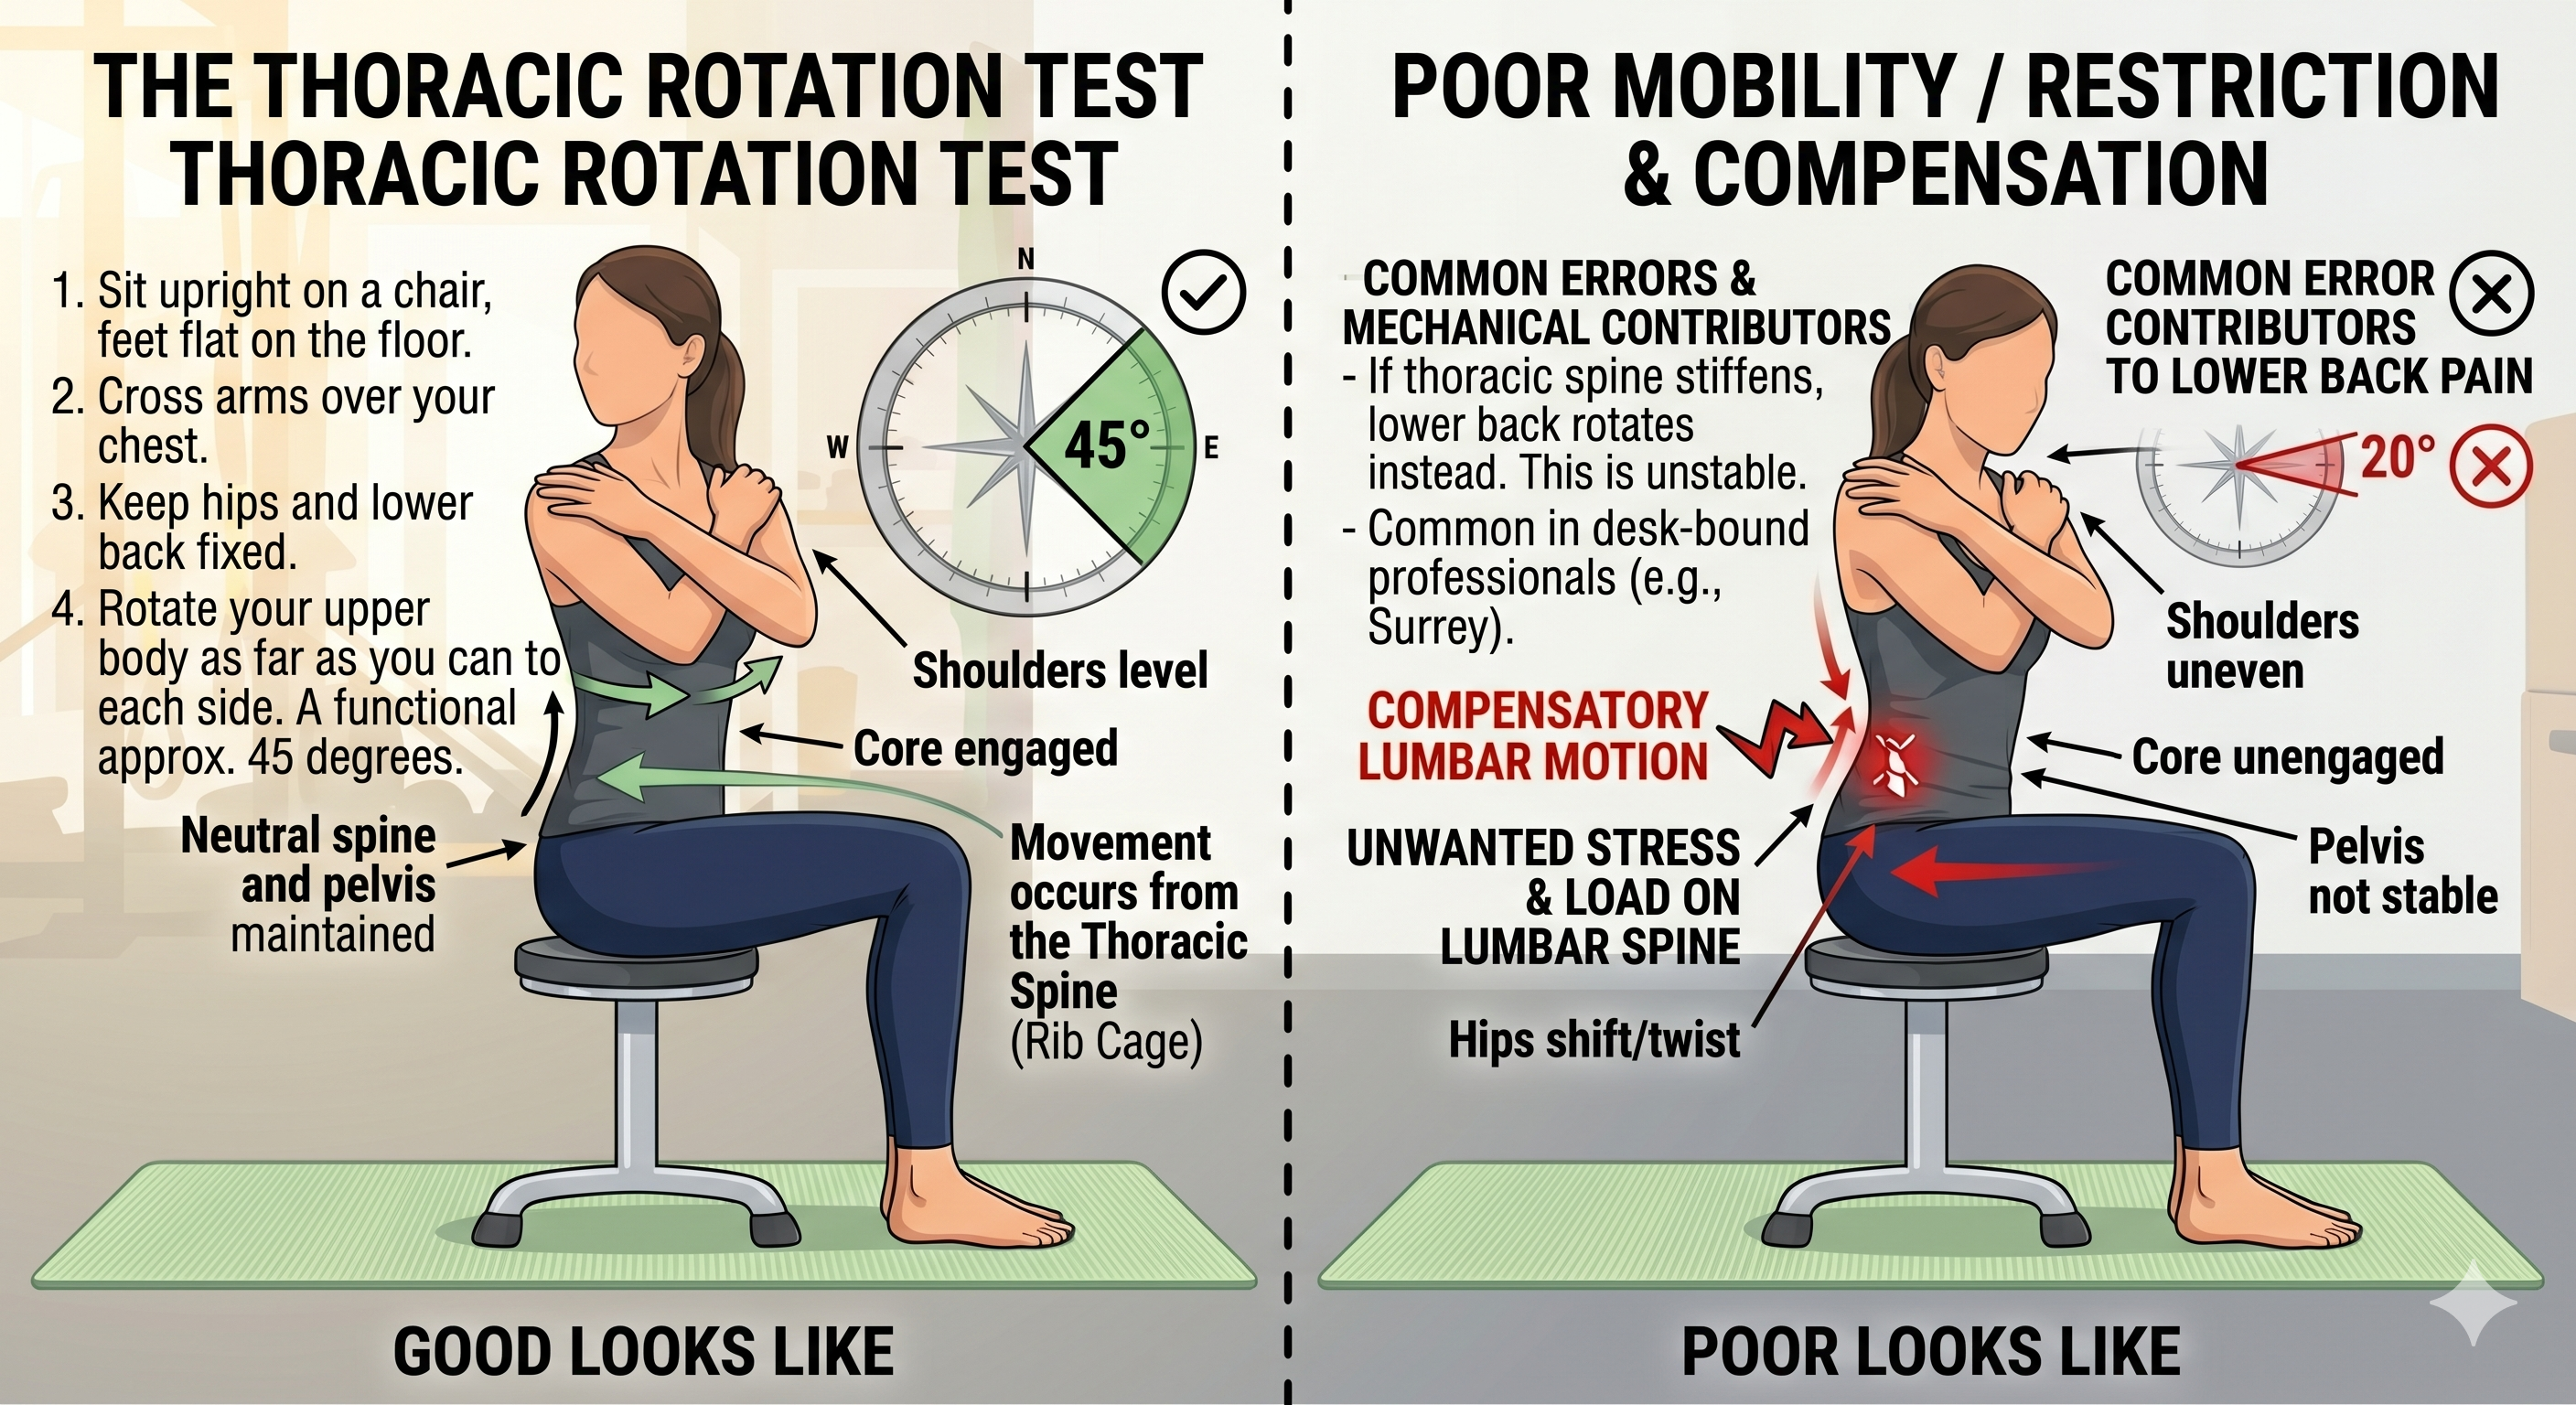
An illustrative infographic titled 'The Thoracic Rotation Test' comparing correct form to common mechanical restrictions that contribute to lower back pain. On the left side, 'Good Looks Like,' a seated figure maintains a neutral spine, level shoulders, and engages the core while rotating 45 degrees, with motion originating from the mid-back (rib cage). A compass visual confirms a functional 45-degree range. On the right, 'Poor Looks Like,' is titled 'Poor Mobility / Restriction & Compensation' and details common errors and risks. The figure shows restricted rotation, uneven shoulders, an unengaged core, and an unstable pelvis, which can lead to 'Compensatory Lumbar Motion.' Annotations highlight this restriction as a key mechanical contributor to lower back pain, emphasizing 'Unwanted Stress & Load on Lumbar Spine' when the thoracic spine stiffens, often seen in desk-bound professionals (e.g., Surrey). Both diagrams include a seated figure on a gym mat in an athletic facility.
Use the Seated Thoracic Rotation Test to assess your mid-back mobility and identify potential mechanical contributors to chronic lower back pain.

3. The Single-Leg Balance Test

Stand on one leg with your eyes open. You should be able to hold a stable, controlled position for 30 seconds without significant wobbling, compensating through your trunk, or putting your foot down. Then close your eyes and try again.

Balance is a direct measure of proprioceptive function -- the nervous system's ability to sense and control joint position. Decline in this capacity accelerates after 40, particularly in people who spend most of their day seated, because the stabilising muscles of the ankle, knee, and hip are chronically underloaded. Poor single-leg stability also indicates that your glutes are not functioning as primary stabilisers, which means your lower back almost certainly is.
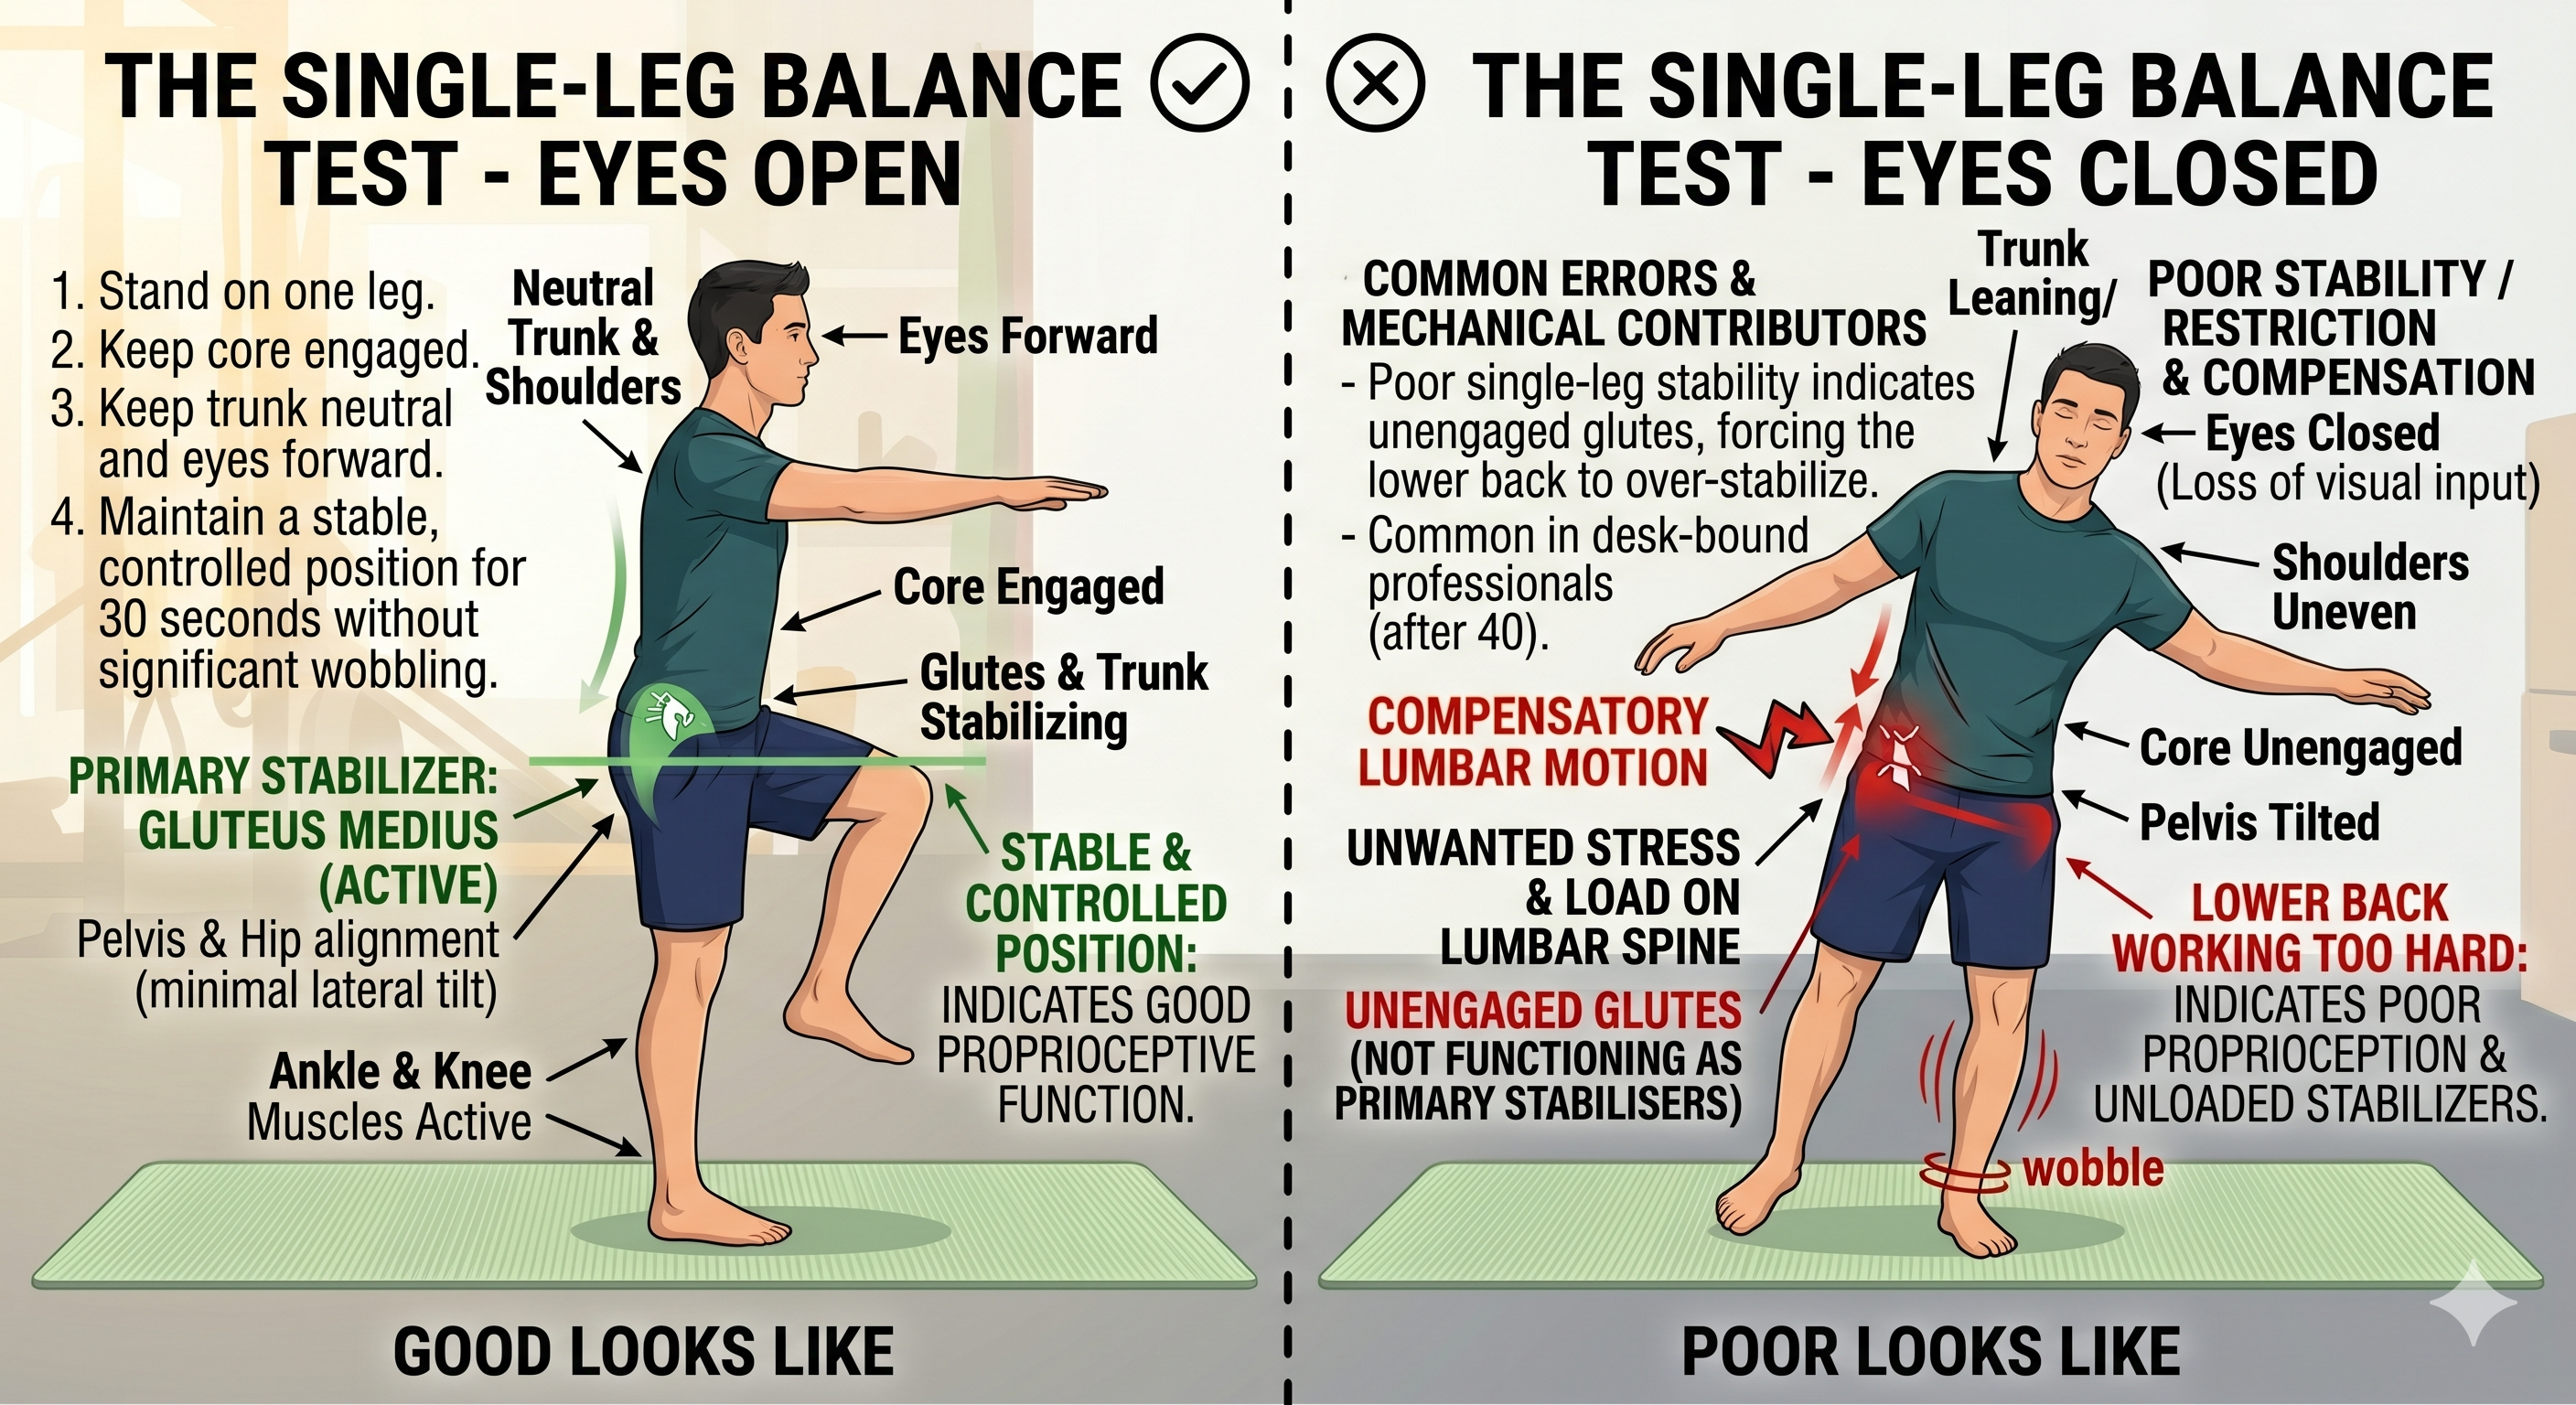
An infographic with two panels titled "THE SINGLE-LEG BALANCE TEST." The left panel, "GOOD LOOKS LIKE," shows a male in a teal t-shirt and blue shorts, standing balanced on his right leg on a green mat, arms extended. Labels point to "Eyes Forward," "Neutral Trunk & Shoulders," "Glutes & Trunk Stabilizing," and "Core Engaged." Text highlights the test steps and "PRIMARY STABILIZER: GLUTEUS MEDIUS (ACTIVE)," noting "GOOD PROPRIOCEPTIVE FUNCTION." The right panel, "POOR LOOKS LIKE," features the same male struggling with eyes closed, trunk leaning, arms flailing, and left leg wobbling. Labels indicate "TRUNK LEANING," "PELVIS TILTED," and "COMPENSATORY LUMBAR MOTION," with a critical note about "LOWER BACK WORKING TOO HARD" due to "UNENGAGED GLUTES." Text explains common errors and "UNWANTED STRESS & LOAD ON LUMBAR SPINE" common in desk-bound professionals. Both diagrams are in a clean, professional illustration style against a neutral gym background.
Master your balance and reduce back pain by activating your glutes and core, as shown in this single-leg balance test infographic.

4. The Hip Hinge Pattern Test

Stand with your feet hip-width apart. Place one hand on your sternum and one on your lower back. Hinge forward from the hips -- pushing them back rather than bending at the waist -- until your torso is roughly parallel to the floor. The hand on your lower back should stay relatively still. If your lower back rounds immediately, or if you feel the movement happening predominantly in your spine rather than your hips, you have lost the hip hinge pattern.

This matters beyond the gym. The hip hinge is the fundamental movement pattern for picking things up, loading luggage, and getting in and out of a car safely. When it breaks down, the lumbar spine takes the load that the glutes and hamstrings should be absorbing. Over years, that misdirected load accumulates.
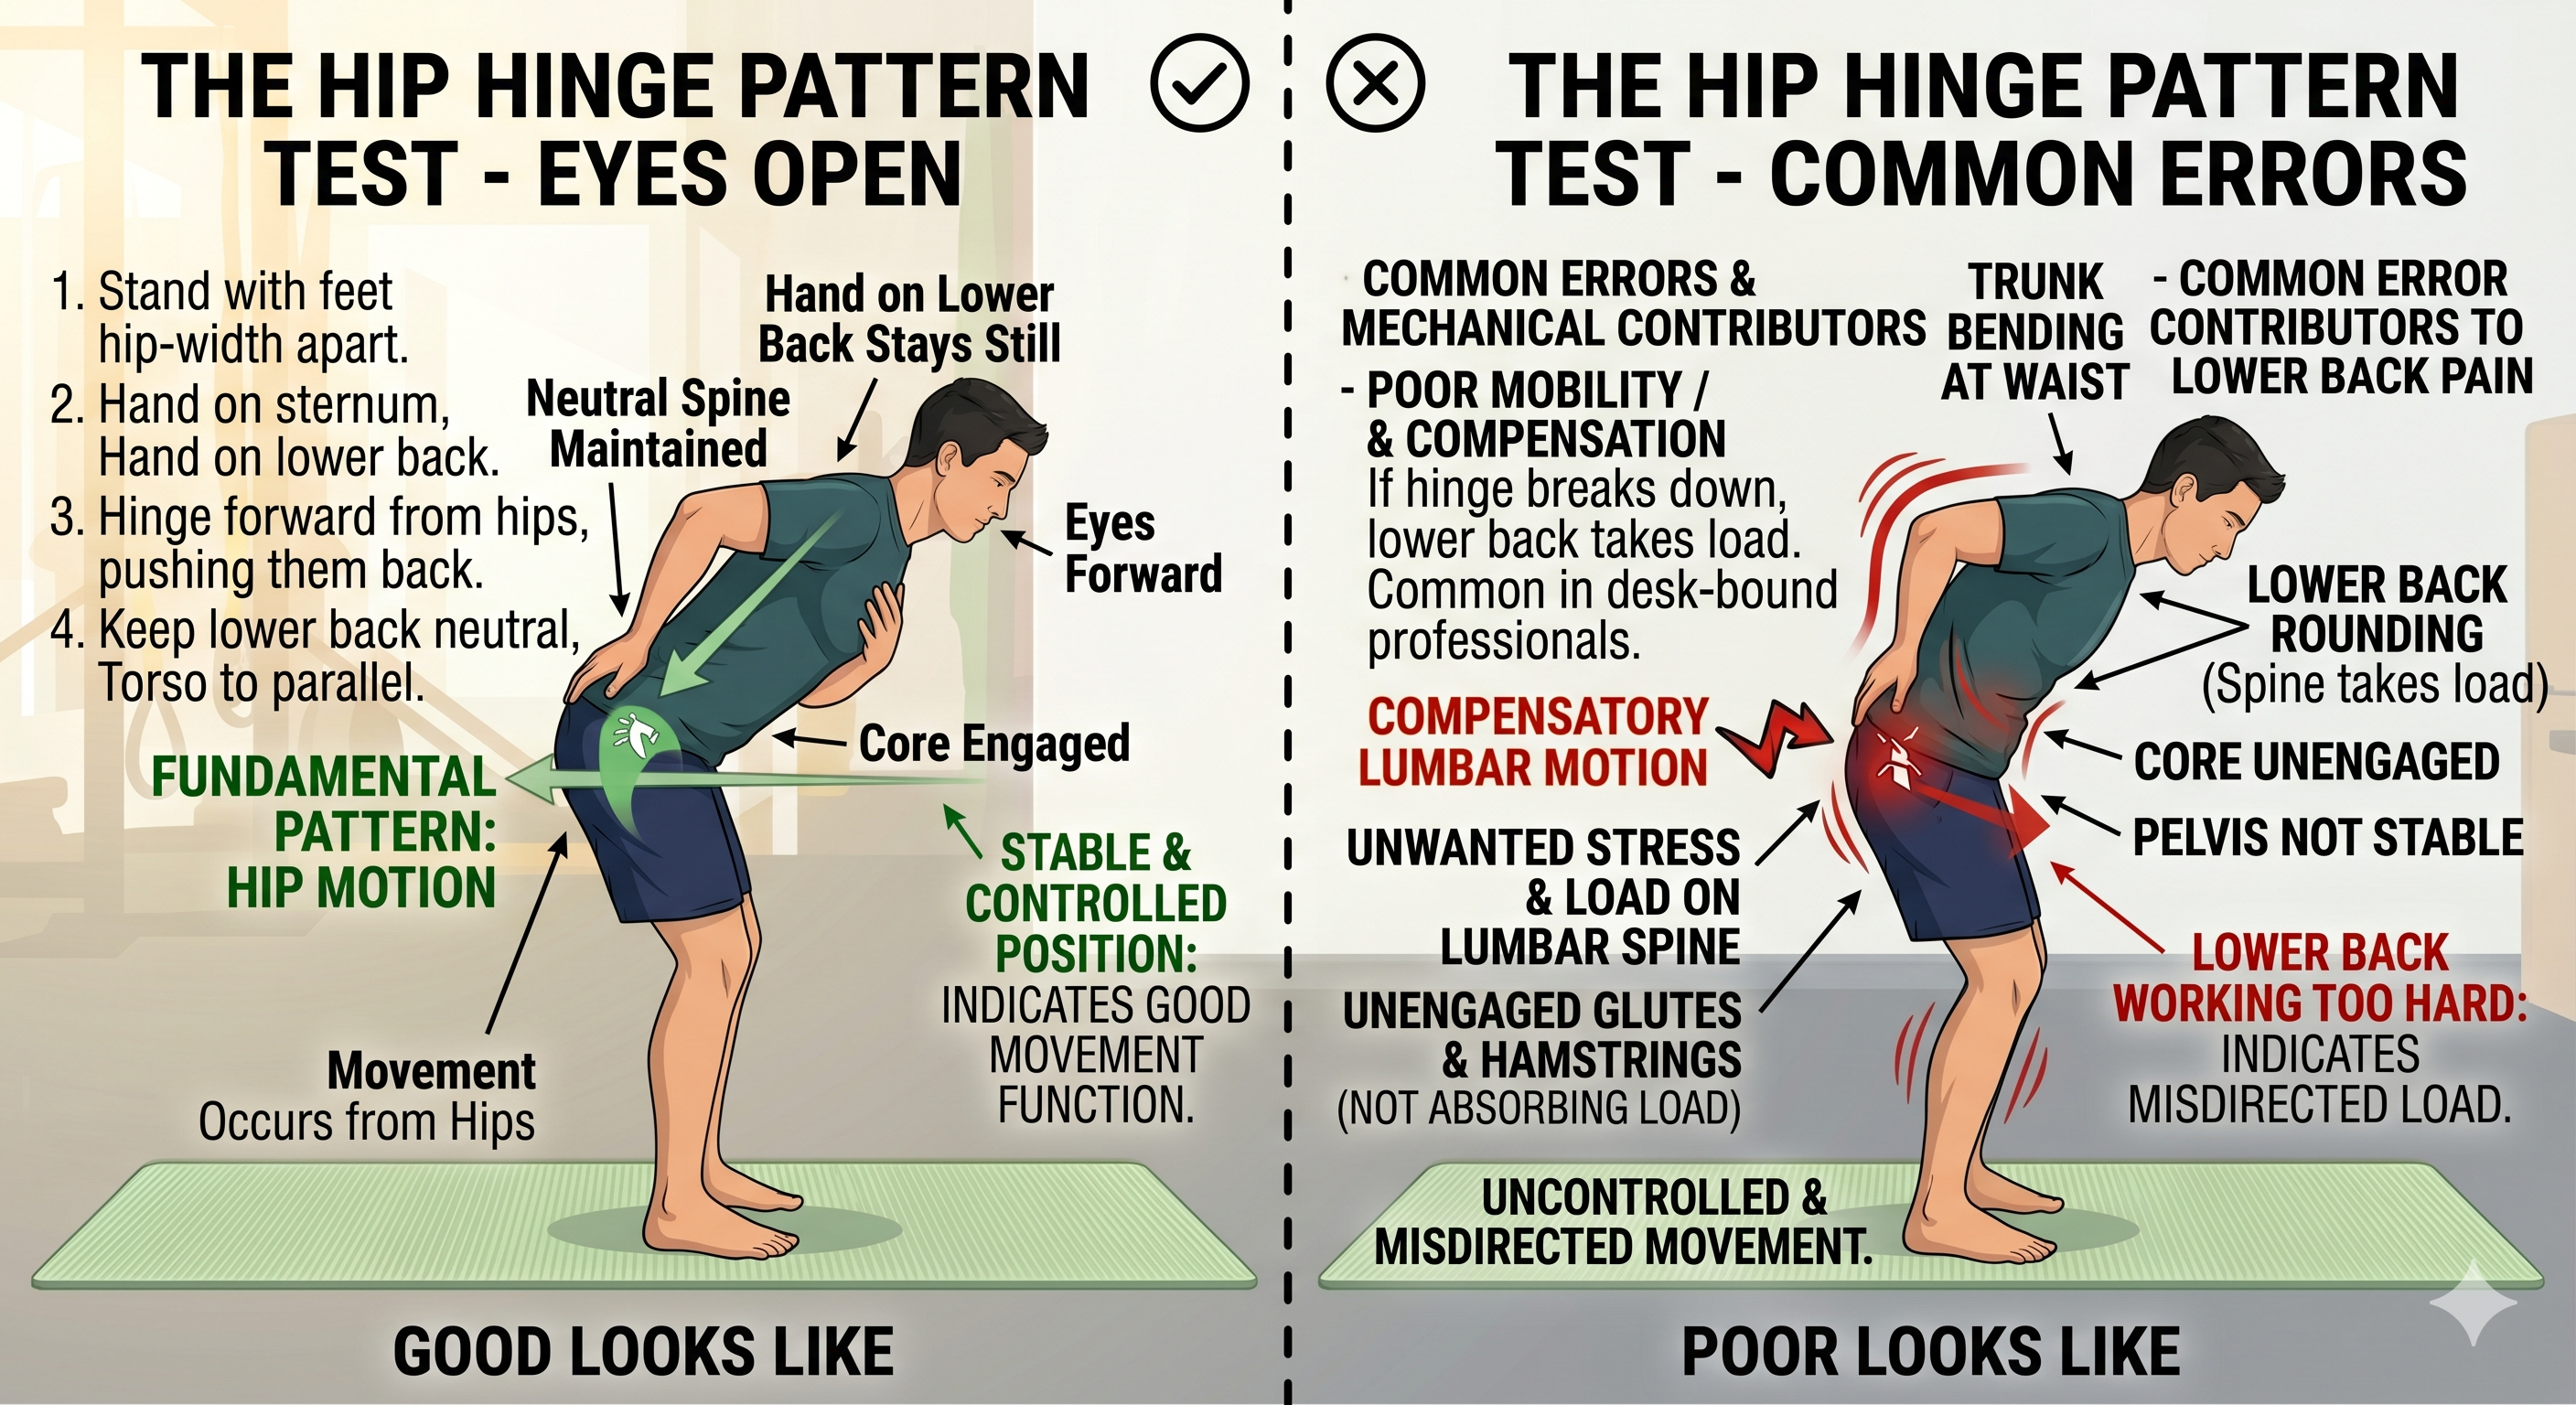
An infographic with a split-panel design comparing a correct hip hinge to a poor hip hinge with common errors. The left panel, labeled "GOOD LOOKS LIKE," shows a person with a neutral spine, engaged core, and level shoulders, successfully hinging forward from the hips while looking straight ahead. Red arrows and text boxes with a green checkmark indicate proper movement, noting "FUNDAMENTAL PATTERN: HIP MOTION," "NEUTRAL SPINE MAINTAINED," "CORE ENGAGED," and "MOVEMENT OCCURS FROM HIPS." The right panel, "POOR LOOKS LIKE," with a red 'X', shows a person with a rounded lower back, unengaged core, and titled pelvis. Multiple annotations highlight errors and mechanical contributors to lower back pain, such as "EXCESSIVE LUMBAR ARCHING," "ANTERIOR PELVIS TILT," "CORE UNENGAGED," "LOWER BACK ROUNDING," and "COMPENSATORY LUMBAR MOTION." A red graphic overlay on the lower back emphasizes "UNWANTED STRESS & LOAD ON LUMBAR SPINE" and "LOWER BACK WORKING TOO HARD." The title at the top says "THE HIP HINGE PATTERN TEST." Both diagrams show a figure kneeling on a green yoga mat in a gym setting with workout equipment in the background.
Master the hip hinge pattern to move without back pain by stabilizing your pelvis and engaging your core for safe daily activity.

5. The Wall Angel Test

Stand with your back flat against a wall, heels a few inches forward, and try to press the back of your head, your upper back, and both arms flat against the wall simultaneously. If you cannot get all three points of contact without straining, or if your lower back arches significantly away from the wall, you have the postural profile of someone who has been sitting at a desk for a long time.

This test reveals the combined effect of thoracic kyphosis, forward head position, and restricted shoulder mobility -- the postural cluster that develops over years of screen work. It is not cosmetic. It affects breathing mechanics, shoulder function, and the load distribution through your entire spine.
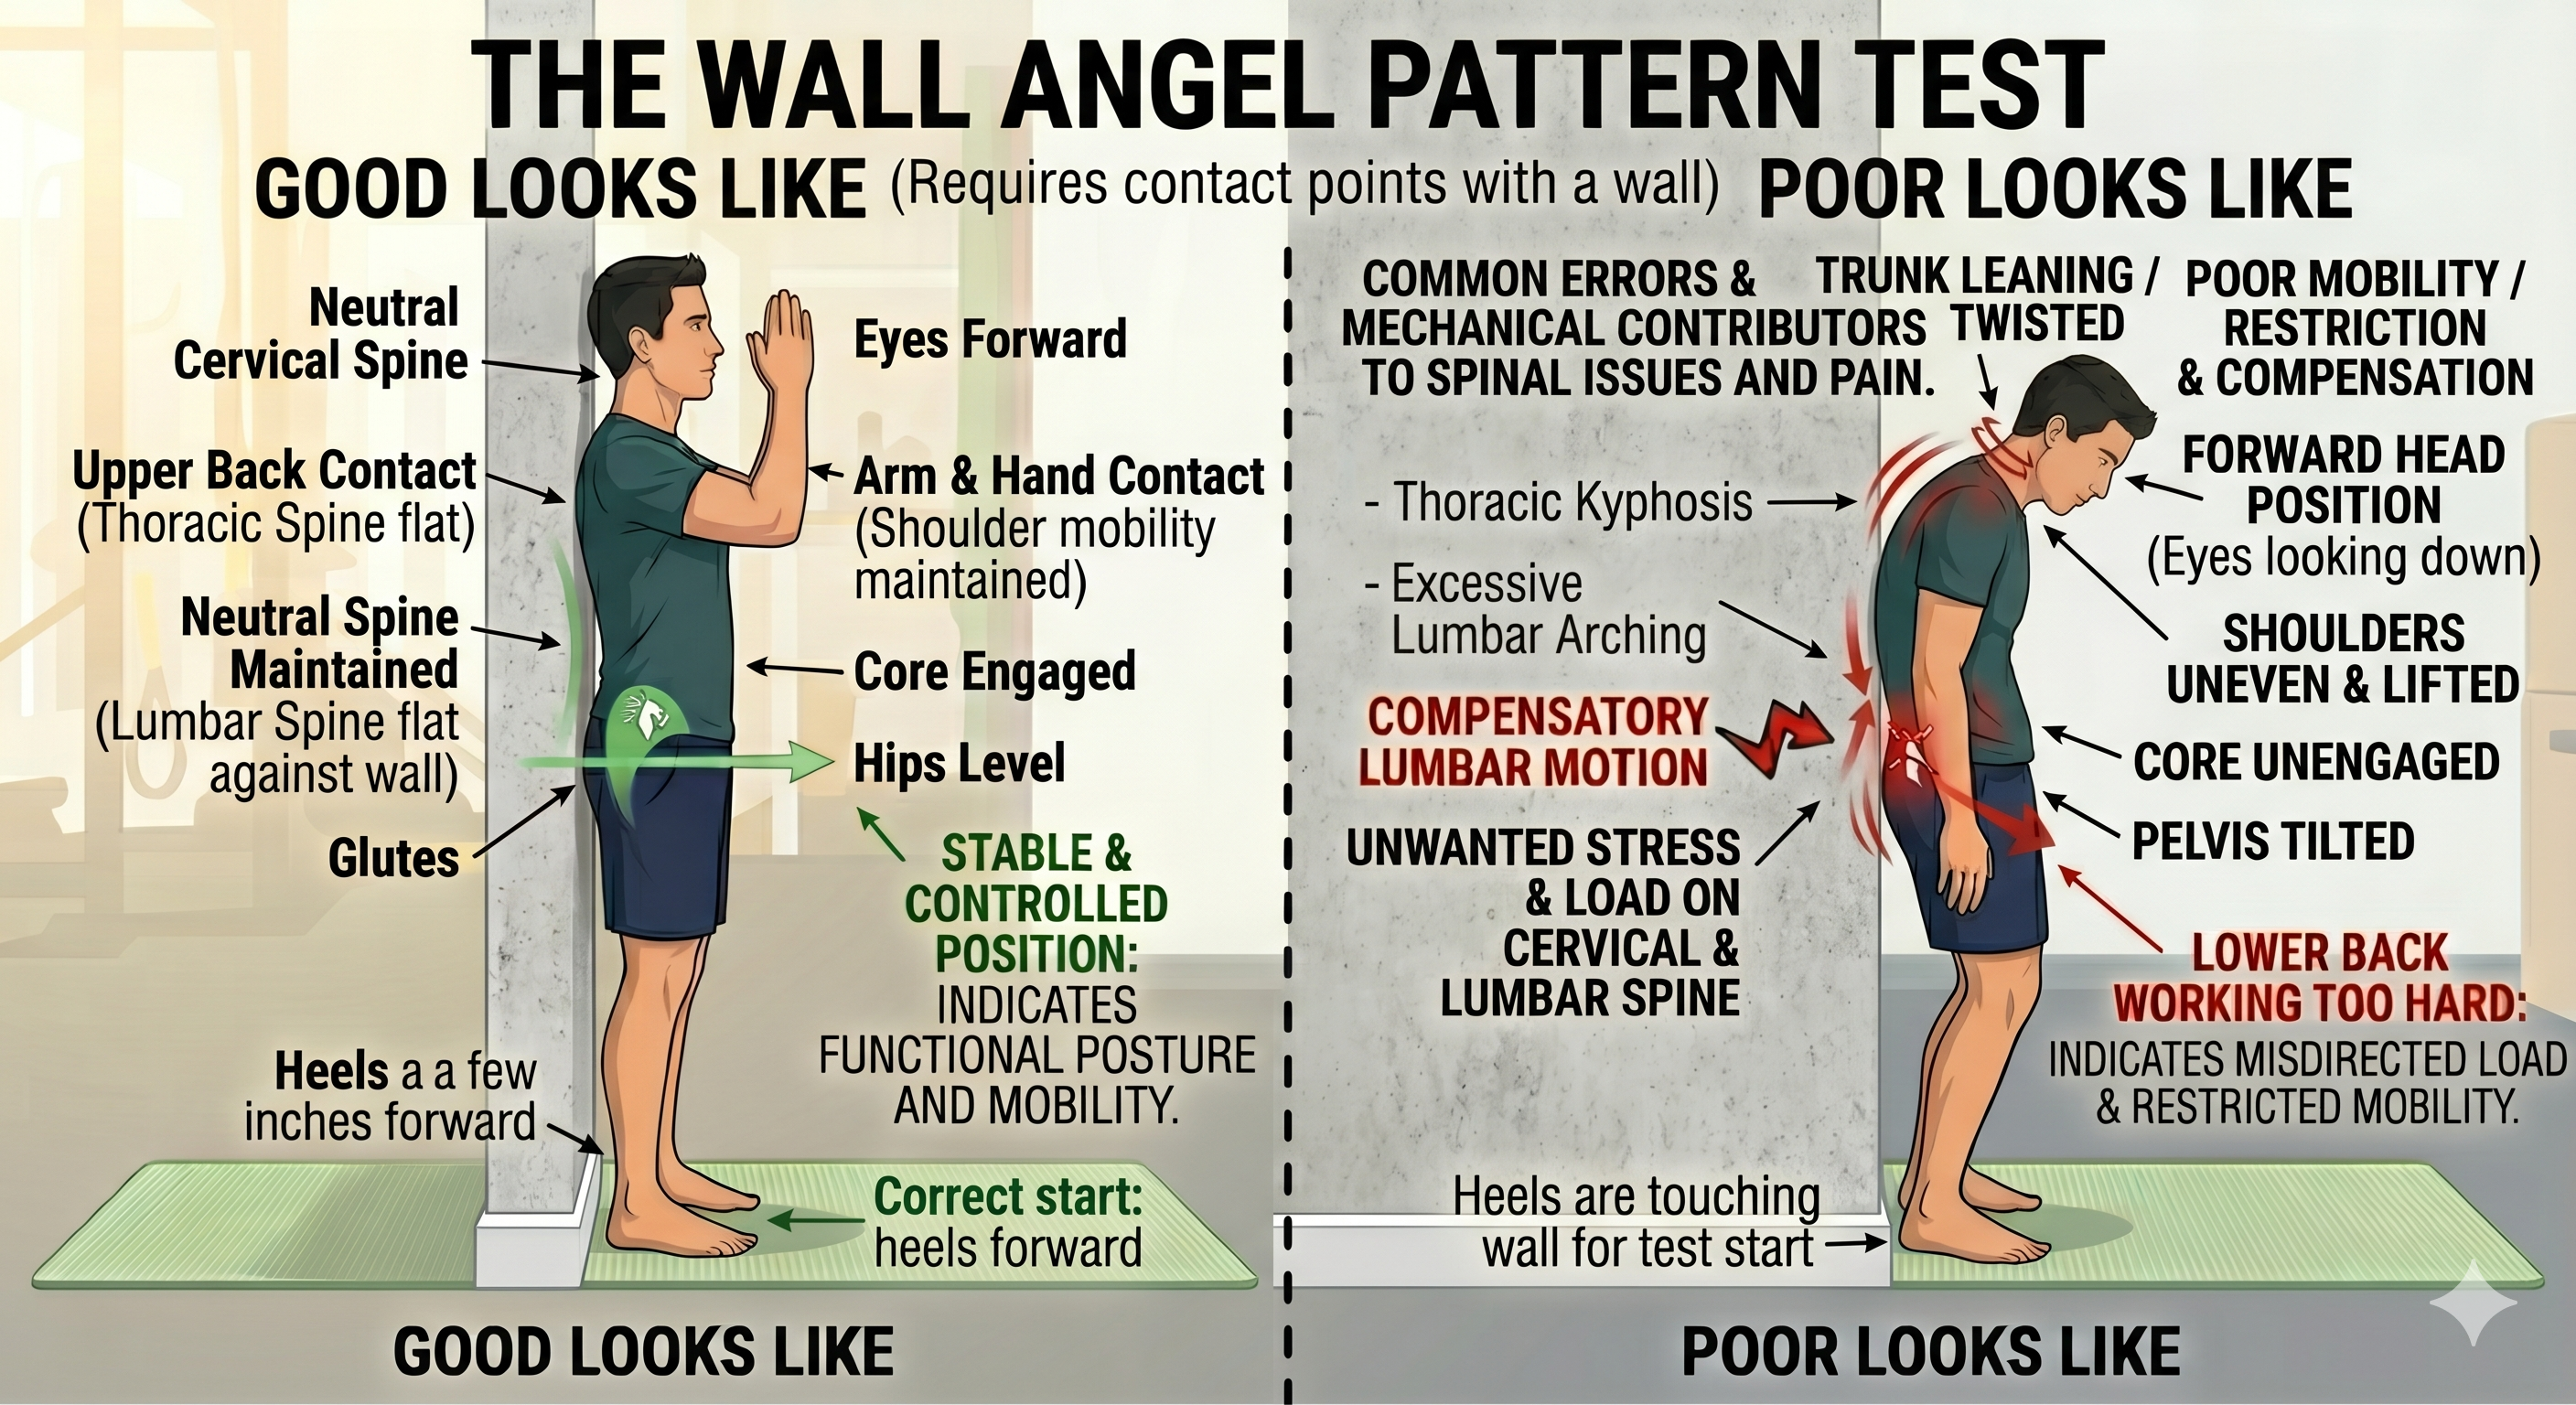
An infographic with a split-panel comparison titled "THE WALL ANGEL PATTERN TEST." The left panel, labeled "GOOD LOOKS LIKE (Requires contact points with a wall)," shows a male in a green t-shirt and blue shorts with proper posture against a light concrete wall on a green mat. Annotations point to success metrics: "Neutral Cervical Spine," "Eyes Forward," "Upper Back Contact (Thoracic Spine flat)," "Arm & Hand Contact (Shoulder mobility maintained)," "Neutral Spine Maintained (Lumbar Spine flat against wall)," "Core Engaged," "Hips Level," "Glutes," and "Heels a a few inches forward." A text box reads: "STABLE & CONTROLLED POSITION: INDICATES FUNCTIONAL POSTURE AND MOBILITY." with a green checkmark. The right panel, "POOR LOOKS LIKE," with a red 'X', shows a second male with significant postural errors. Labels point to faults: "TRUNK LEANING / TWISTED," "Thoracic Kyphosis," "Excessive Lumbar Arching," "COMPENSATORY LUMBAR MOTION," "UNWANTED STRESS & LOAD ON CERVICAL & LUMBAR SPINE," "FORWARD HEAD POSITION (Eyes looking down)," "SHOULDERS UNEVEN & LIFTED," "CORE UNENGAGED," "PELVIS TILTED," and "LOWER BACK WORKING TOO HARD." Text boxes note: "COMMON ERRORS & MECHANICAL CONTRIBUTORS TO SPINAL ISSUES AND PAIN" and "POOR MOBILITY / RESTRICTION & COMPENSATION," with details on misdirected load and uncontrolled movement. Arrows in red highlight problems. The overall illustration is clean and educational, with a subtle gym background.
Learn to identify good and poor posture by using this visual guide to the Wall Angel mobility test.

What Your Results Tell You

If two or more of these tests were difficult or revealing, you are not dealing with an age problem. You are dealing with a movement deficit that has been accumulating across your professional career, and that will continue to accumulate unless it is directly addressed.

The good news is that structural deficits are correctable. Not with stretching programmes or passive treatment, but with a systematic approach that restores mobility first and then rebuilds strength through the ranges of motion the desk has been restricting.

That is the work I do with clients at Lightwater Leisure Centre. If you are in Surrey and you want to understand exactly where your structural baseline sits and what it would take to address it properly, the starting point is an intro session.

Book your free introduction here.


Rob Ede is the founder of Ede Fitness and creator of the PrimeFit coaching programme, based at Lightwater Leisure Centre, Surrey. He works exclusively with busy professionals aged 40 to 60 who want evidence-based coaching, not generic gym advice.

Disclaimer: This article is for informational purposes only and does not constitute medical advice. If you are experiencing back pain, consult a qualified healthcare professional before beginning any exercise programme.


Rob Ede

Rob Ede

Rob Ede is a Level 4 nutrition and Strength Coach based at Lightwater Leisure Centre. He works with busy professionals across Surrey, helping them build strength, improve health and stay capable as they get older.

LinkedIn logo icon
Instagram logo icon
Youtube logo icon
Back to Blog